Wednesday, December 28, 2016

Shop Organization: Cut-Off Bin


I spent a few hours over Christmas building this cutoff bin for the shop. It took one and a half sheets of 3/4" plywood. That's kind of pricey but it's built to last and holds a surprising amount of scraps.


In addition to the plywood that I bought, for the spacers I used some of the trim from the porch project of a couple years ago. Most of the joints are held together with pocket screws along with some glue. Here's a before and after shot:


 Some of you will look at this and think it's not much better, but trust me: It is! It's hard to tell from the photo, but I added pair of brackets on the back to hold larger pieces of sheet goods. That's a 4x4 piece of plywood on the back (along with a few other smaller sheets) so it really does organize an awful lot of wood.


Handmade Christmas 2016


I had large plans for gifts this year but my work/life schedule just didn't allow me to be elaborate so I toned things down a bit this year. However, even with that, my gifts came out well, are loved, and I enjoyed making them.


I made a wooden disk table runner for Sarah. I was lucky to have a nicely seasoned beech limb in the shop left over from some previous project. I set up my chop-saw so that I'd be cutting slices of the same thickness and went at it. I tried to arrange them in a pattern which I think came out well. I used Elmer's white glue to glue them to a piece of felt. I wasn't sure about how well the white glue would hold up but now, after much handling, it seems to work OK. I think we'll probably still treat it fairly gently, though. I finished it with a light coat of spray varnish.

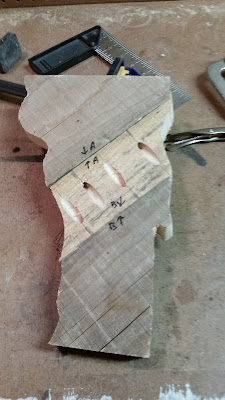
Elizabeth is heading off to college next year, so I wanted to give her something to remind her of home. This barn board silhouette of Vermont is just the thing. (If she goes to the University of Vermont, she probably won't want it but it'll work for the other schools she's interested in!)

(prior to sanding)

(I love pocket screws!)


I used this silhouette for both Vermont themed gifts this year. After using it, I realized I could have just cut it out and traced it but I transferred it using pencil instead. It worked fine. After sanding the edges, I gave it several coats of spray varnish (front and back). The front is still a bit splintery, though, so you have to be careful handling it. I nailed a hanger on the back so that it can hang on a wall easily. I used a couple hemlock boards left over from building the barn for this one. Since they had been outside for a few years, they were nicely weathered.


This gift for Helen caused me quite a bit of geek and symmetry angst. The geeky angst came from the fact that I made the one with the heart in the middle of the state first - and it came out quite well. BUT the heart isn't over Hartland so the map geek in me forced me to do another with the heart in the right place.
The second one is the one that caused a lot of symmetry angst. As you can see from the picture above, the heart is in the right place but I could NOT get the string to look decent. I ended up stringing this one 3 times - including the last time on Christmas eve! But it came out well so it was worth it.


I used plain old 1-by for the base and 7/8" cut nails. I finished the wood (front and back) with some spray varnish prior to stringing.


Sunday, June 12, 2016

Crankie Box for Sarah

Sarah needed a "crankie box" for a workshop she's running this summer so she asked me to make her one. Basically, it's like a big film-strip machine like I had in school when I was a kid. There's a 18" x 5 yard piece of vellum between two rollers upon which you draw or paint a story. The one in the picture is still blank but it'll get painted soon enough.
I started with the two rollers. You can see from this picture (from behind) how they fit in.
The rollers are in the back and the dowels in the front are fixed and provide a little bit of tension on the vellum to keep it rolling smooth and flat. They are 1/2" dowels. The tops of the rollers have handles on them that let the person projecting turn the vellum across the rollers.
Here's an action shot of the rollers being used. This is before I put the outer face frame on it.
I added a light fixture so that whatever is being shown will be back lit. You can also see the face-frame in place.
Here's a shot of the tops of the rollers and the removable arms I used. I added a handle, too, to make it easier to carry. It's quite large. The handles slip out so that you can remove the roller to wind a new "show" on.
Overall, it's about two feet square and ten inches deep. The display area is 17 3/4" square.
I had a really nice time building this. It's been a while since I was in the shop so it felt great to get down there for a nice day of work.
Here are some other construction details.
I used blue painter's tape to mark the various holes I needed to drill as well as front, back, bottom, top. It really helped me keep things straight and I didn't have to sand off a lot of pencil marks.

This is the bottom of one of the rolls before I trimmed it off. The dowel fits in a hole in the bottom and the wheel helps keep the height where I want it and guides the vellum, too. The roller is a 1" dowel and the little one on the end is 3/8".