Saturday, February 18, 2017

Fidget Spinners


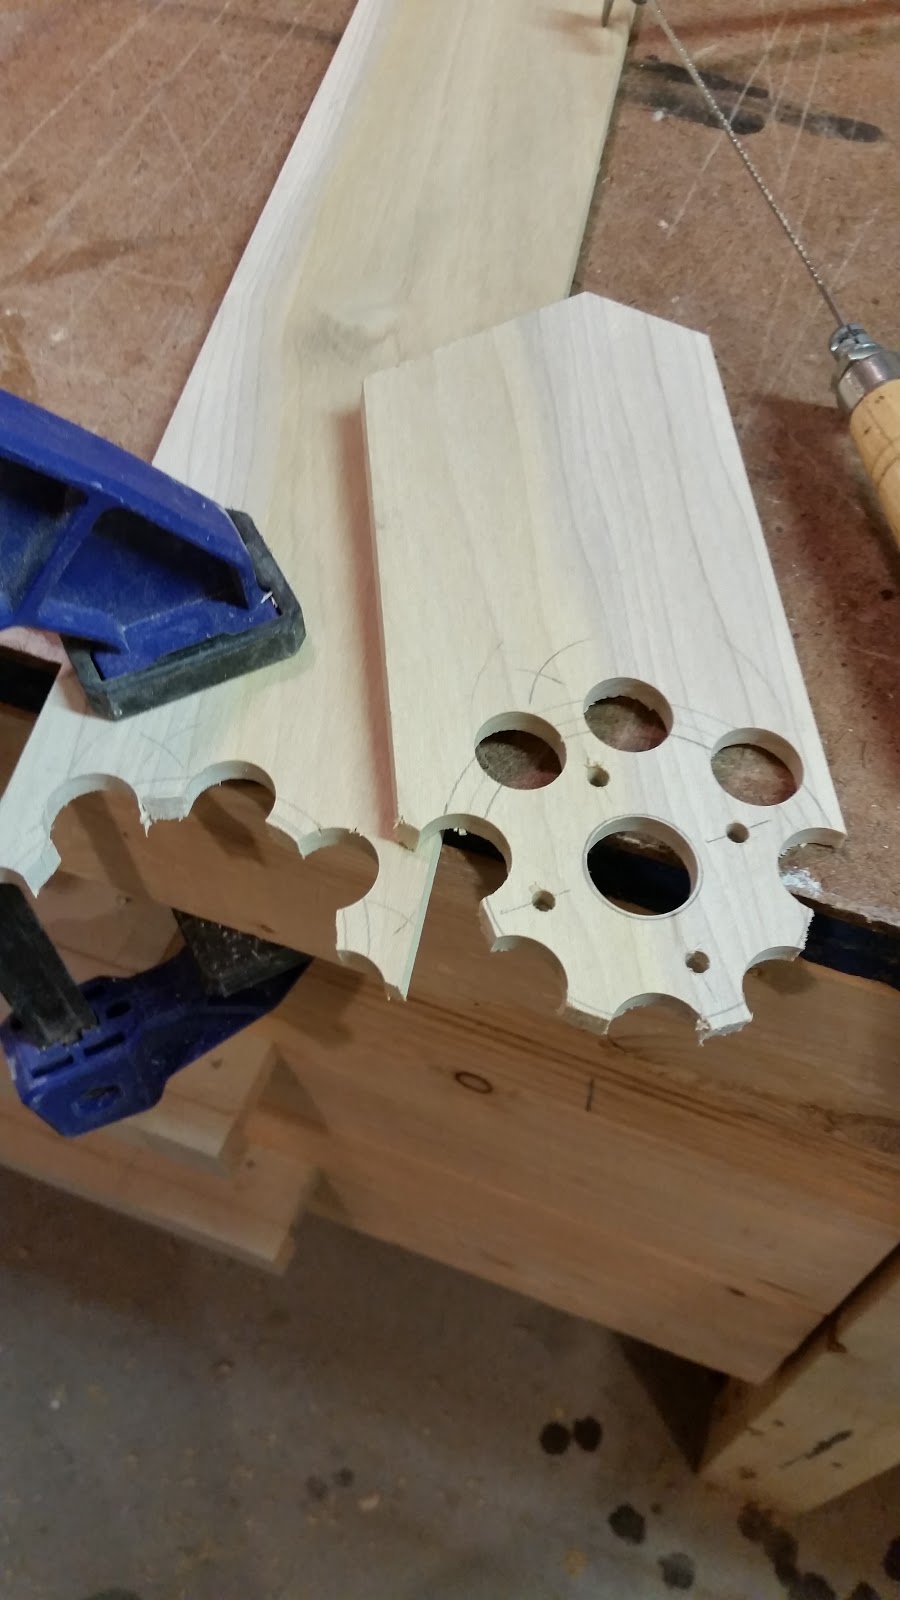
I got it in my head to create a few fidget spinners. These are all over the place now but I wanted to give one a try. I bought a package of skateboard bearings and a 22mm forstner bit to cut the right size holes and got started. This post shows one of the equilateral triangle builds but all of the triangular ones are built the same way, pretty much. I refined my technique as I went.


I start by scribing an equilateral triangle on my wood. The wood is 1/4" poplar from the Home Depot, which I've used for all kinds of projects. Turns out, it's just the right thickness for the skateboard bearings. I mark the key drilling points with the awl so that I can line up the drill bits correctly.


First, I drill the hole for the bearing - it's 22mm. I learned after doing a couple that it's best to keep the triangle outlined on the large piece of wood so that I have something to clamp to when drilling. It keeps things stable and much safer. I marked the center of the triangle by drawing a line perpendicular to the each side passing through the opposite apex. Again, I marked the hole with the awl to make it easy to align the forstner bit.


Next come the spots where I inset the nuts for the bolts and then the through-holes for the bolts. The nut insets are 3/8" and the bolt pilot holes are 5/32". I drilled the nut insets first which left an indentation in the center. That center indentation was exactly where I had to drill the bolt pilot holes so they were easy to align. I inset the center of the nut insets 1/2" from each triangle apex.


Now that I had all the holes pre-drilled, it was time to cut out the triangle. 2 cuts at 30 degrees each got the triangle out. It is an equilateral triangle, 2-1/2" per side.


Then it was time for sanding. It's much easier to get the pencil marks off before doing any hardware installation or gluing. I sand all the surfaces on the belt sander but I sand the triangle apexes by hand with a little sand paper - it's easier to control that way. I use my belt sander clamped to a saw-horse to do this. It's a reasonable facsimile of a bench sander.


Now it's time to mount all the hardware. First I put in the bearing with just a couple spots of super glue to hold it in place. Before I put the bearing in, I clean it with WD-40. When you buy the bearings, they come packed with grease which prevents them from spinning freely. The WD-40 really loosens them up.

 Then I mounted the machine screws and their nuts.
Last, I insert the center bolt and its nut. I super glue all the nuts in place.

 I use a dremel tool with a cut-off wheel to trim the bolts flush with the nuts.


Here are all the cut-offs and the spinner looking pretty close to done. Note the safety glasses: these are essential when using the cut-off wheel. It throws a surprising amount of metal splinters and sparks. I dab a drop of super glue onto each nut to keep them in place.


And here's the finished project.


The munsen ring spinner has less construction but took a bit of figuring to get it together well. The trick is to clamp each side with vice-grips before inserting the screws. If you don't clamp them, the ring doesn't hold the bearing well. I added the cap-nuts for looks - I think they look pretty good. Even though I cleaned the bearing on this one, it doesn't spin as well as the wooden ones. I think it might be because I really tightened the screws and nuts hard. But it has a satisfying heft and spins OK.

Here are a couple spinners in action.


Update (12 March, 2017)
I've really enjoyed making these spinners. I brought a few to my office and people really love to mess with them while we're talking.



I like the round ones quite a bit. I also made a couple oval ones at Liz's suggestion.


Sunday, February 5, 2017

Workbench Drawers


The shop theme in the last few months has been organization. As you can see from the picture, below, I had quite a mess under my bench and it was really not an efficient use of space so I decided to install some drawers.
With the exception of the drawer guides, this whole project was built with leftovers from other projects. The plywood for the carcass, drawer bottoms, and drawer fronts came from the plyo-box, rolling shop carts, and cut-off bin projects. The drawers and drawer pulls were all made from left over porch trim.

What I started from - quite the mess

First, I built a carcass of sorts to hold the drawers. The space it's in is not square, so this presented some challenges later on.

Here's the bottom drawer. It's the first drawer with drawer glides I've ever built. It came out quite well and encouraged me to keep going. As you can see, I used inexpensive under-mount drawer guides.

Undermount drawer guides


Here's the carcass with all the drawers installed. It was much easier to work on with it up on saw horses - but the work still did a number on my back.

Carcass and drawers in place. Drawer fronts still to do.

Here is the finished project with drawer fronts (3/4" ply) and homemade drawer handles. I went with homemade because I didn't want to spend any more money on the drawers and I had what I needed lying around. They're a little clunky looking but they get the job done.
You can see on the right another empty space under the bench. I'll probably build another set of drawers for that space. It's amazing how much better the drawers make the whole shop look.
Everything is made from 3/4" stock so it's all big and heavy. I'll probably use 1/2" for the other set of drawers.

Sunday, January 1, 2017

File Drawer Organizer


Continuing on the theme of organizing this holiday season, I built this organizer insert for a file drawer that I plan on using at work. My desk at work doesn't have a shallow drawer for pencils, etc.; only two deep file drawers that I don't use. This insert will fit down in and let me have the small stuff at hand easily.
This box is 11 3/4" x 17 1/2". The trim on the sides makes the total width 12 7/8". Total height is 5 1/4". The pencil tray is 4 1/2" x 10  1/8" x 1 3/4".
I started with 1-by that was left over from the porch trim project a couple years ago. I ripped them down to 5 inches and built a box with pocket screws. I used some left over hardboard for the bottom, which  I glued and nailed on.


I added a thin runner down each side so that a smaller pencil box could sit in the insert and move along the rails. These are just glued in as they will not carry much weight.


Next, I made the pencil box. The picture, above, is it in process. I added another divider a bit later on. Its bottom is quarter inch luan left over from another drawer or box project (can't remember which). I was pleased at how easy it was to get this glue up nice and square. You can never tell how tricky that kind of thing will be especially when you're using thin wood like this.


The top is trimmed with quarter-inch luan, too. The trim on the sides sticks out about 7/8". The side trim sits on the rails that are used for file hangers and support the weight of the box. They are glued and nailed and feel really solid so I'm hopeful that they'll carry the weight of the box and contents well. Even though there's a lot of wood in this project, it's surprisingly light weight. This picture shows a bit of the construction technique I used on the box. After glueing the corners but before driving in the pocket screws, I shot in some trim nails to help keep everything in place. Then I let the glue cure for a few minutes so that things stayed aligned while I drove the screws. I have found that unless you're careful when driving pocket screws (or don't use clamps), the parts you're screwing together can come out of alignment easily. Using nails and letting the glue set helped a lot.
I tested the fit on a file cabinet I have here at home so I'm pretty sure it'll fit at work even though the drawer design is slightly different. Since I took my measurements from the work drawer before the holidays and I checked it against a hanging file, I think it'll work.


Wednesday, December 28, 2016

Shop Organization: Cut-Off Bin


I spent a few hours over Christmas building this cutoff bin for the shop. It took one and a half sheets of 3/4" plywood. That's kind of pricey but it's built to last and holds a surprising amount of scraps.


In addition to the plywood that I bought, for the spacers I used some of the trim from the porch project of a couple years ago. Most of the joints are held together with pocket screws along with some glue. Here's a before and after shot:


 Some of you will look at this and think it's not much better, but trust me: It is! It's hard to tell from the photo, but I added pair of brackets on the back to hold larger pieces of sheet goods. That's a 4x4 piece of plywood on the back (along with a few other smaller sheets) so it really does organize an awful lot of wood.


Handmade Christmas 2016


I had large plans for gifts this year but my work/life schedule just didn't allow me to be elaborate so I toned things down a bit this year. However, even with that, my gifts came out well, are loved, and I enjoyed making them.


I made a wooden disk table runner for Sarah. I was lucky to have a nicely seasoned beech limb in the shop left over from some previous project. I set up my chop-saw so that I'd be cutting slices of the same thickness and went at it. I tried to arrange them in a pattern which I think came out well. I used Elmer's white glue to glue them to a piece of felt. I wasn't sure about how well the white glue would hold up but now, after much handling, it seems to work OK. I think we'll probably still treat it fairly gently, though. I finished it with a light coat of spray varnish.

Elizabeth is heading off to college next year, so I wanted to give her something to remind her of home. This barn board silhouette of Vermont is just the thing. (If she goes to the University of Vermont, she probably won't want it but it'll work for the other schools she's interested in!)

(prior to sanding)

(I love pocket screws!)


I used this silhouette for both Vermont themed gifts this year. After using it, I realized I could have just cut it out and traced it but I transferred it using pencil instead. It worked fine. After sanding the edges, I gave it several coats of spray varnish (front and back). The front is still a bit splintery, though, so you have to be careful handling it. I nailed a hanger on the back so that it can hang on a wall easily. I used a couple hemlock boards left over from building the barn for this one. Since they had been outside for a few years, they were nicely weathered.


This gift for Helen caused me quite a bit of geek and symmetry angst. The geeky angst came from the fact that I made the one with the heart in the middle of the state first - and it came out quite well. BUT the heart isn't over Hartland so the map geek in me forced me to do another with the heart in the right place.
The second one is the one that caused a lot of symmetry angst. As you can see from the picture above, the heart is in the right place but I could NOT get the string to look decent. I ended up stringing this one 3 times - including the last time on Christmas eve! But it came out well so it was worth it.


I used plain old 1-by for the base and 7/8" cut nails. I finished the wood (front and back) with some spray varnish prior to stringing.


Sunday, June 12, 2016

Crankie Box for Sarah

Sarah needed a "crankie box" for a workshop she's running this summer so she asked me to make her one. Basically, it's like a big film-strip machine like I had in school when I was a kid. There's a 18" x 5 yard piece of vellum between two rollers upon which you draw or paint a story. The one in the picture is still blank but it'll get painted soon enough.
I started with the two rollers. You can see from this picture (from behind) how they fit in.
The rollers are in the back and the dowels in the front are fixed and provide a little bit of tension on the vellum to keep it rolling smooth and flat. They are 1/2" dowels. The tops of the rollers have handles on them that let the person projecting turn the vellum across the rollers.
Here's an action shot of the rollers being used. This is before I put the outer face frame on it.
I added a light fixture so that whatever is being shown will be back lit. You can also see the face-frame in place.
Here's a shot of the tops of the rollers and the removable arms I used. I added a handle, too, to make it easier to carry. It's quite large. The handles slip out so that you can remove the roller to wind a new "show" on.
Overall, it's about two feet square and ten inches deep. The display area is 17 3/4" square.
I had a really nice time building this. It's been a while since I was in the shop so it felt great to get down there for a nice day of work.
Here are some other construction details.
I used blue painter's tape to mark the various holes I needed to drill as well as front, back, bottom, top. It really helped me keep things straight and I didn't have to sand off a lot of pencil marks.

This is the bottom of one of the rolls before I trimmed it off. The dowel fits in a hole in the bottom and the wheel helps keep the height where I want it and guides the vellum, too. The roller is a 1" dowel and the little one on the end is 3/8".